
Developing applications for Android with graphics such as with 3D can be done in multiple ways. One of these ways is with OpenGL ES API. The OpenGL-ES API is simply a reduced version of the OpenGL rendering API, designed for embedded devices, such as mobile devices. Fortunately, OpenGL-ES has many similarities with OpenGL. Thus, if familiar with OpenGL, then it shouldn’t be hard to understand OpenGL-ES. Though, this will be within the context of Android development and Java. Thus, there are some differences than, for instance, when developing with C/C++.
Here, I will go through the basic setup for starting using OpenGL-ES for Android. The source code can be found on GitHub.
Configure Manifest
First, we need to specify within the AndroidManifest.xml file that we wish to use the OpenGL-ES feature. Furthermore, we can specify the version that the applicants intend to use. The glEsVersion is specified to use version 2.0 as its minimum supported version, see more in the specifications. However, this does not prevent use from using any higher version. Rather that this is the lower version that the application can handle. Since we will later be using shaders that require at least version 2.0.
<?xml version="1.0" encoding="utf-8"?>
<manifest xmlns:android="http://schemas.android.com/apk/res/android"
	package="org.samples.opengles_startup">

	<uses-feature
		android:glEsVersion="0x00020000"
		android:required="true" />

	<application
		android:allowBackup="true"
		android:icon="@mipmap/ic_launcher"
		android:label="@string/app_name"
		android:roundIcon="@mipmap/ic_launcher_round"
		android:supportsRtl="true"
		android:theme="@style/Theme.OpenGLESStartup">
		<activity android:name="org.samples.opengles_startup.MyActivity"
			android:label="@string/app_name">
			<intent-filter>
				<action android:name="android.intent.action.MAIN" />
				<category android:name="android.intent.category.LAUNCHER" />
			</intent-filter>
		</activity>
	</application>

</manifest>
Surface View
The first thing that needs to be done is to create a custom view object. It will be treated similarly to other common view objects, such as TextView, ImageView and etc. Furthermore, it can be used within the layout files as well. But, it will contain the renderer object and associated logic.
import android.app.ActivityManager;
import android.content.Context;
import android.content.pm.ConfigurationInfo;
import android.opengl.GLSurfaceView;
import android.util.AttributeSet;

public class GLGraphicSurfaceView extends GLSurfaceView {
	private GLGraphicRenderer renderer;

	public GLGraphicSurfaceView(Context context) {
		super(context);
		init(context);

	}

	public GLGraphicSurfaceView(Context context, AttributeSet attrs) {
		super(context, attrs);
		init(context);
	}

	protected void init(Context context) {
		detectedGLESVersion(context);
		/*  */
		renderer = new GLGraphicRenderer();

		/* Set the Renderer for drawing on the GLSurfaceView    */
		setRenderer(renderer);
	}

	protected void detectedGLESVersion(Context context){
		ActivityManager am =
				(ActivityManager) context.getSystemService ( Context.ACTIVITY_SERVICE );
		ConfigurationInfo info = am.getDeviceConfigurationInfo();

		/*  Set the OpenGL version */
		if( info.reqGlEsVersion >= 0x30000) {
			setEGLContextClientVersion(3);
		}else{
			setEGLContextClientVersion(2);
		}
	}
}
Render Logic Object
Now with the surface view object is created. We can create the renderer-object for which all the render logic will be executed. It contains a set of callback methods, which are called by the Android system internally. Thus we don’t have to handle when they should be invoked. However, we need to know when they are invoked. The onSurfaceCreated will be called when the surface is created or recreated. The onDrawFrame as the name suggests when invoking to draw the next frame. Finally, onSurfaceChanged is called when the surface has changed size, for instance, when being resized.
import android.opengl.GLES20;
import android.opengl.GLSurfaceView;

import javax.microedition.khronos.egl.EGLConfig;
import javax.microedition.khronos.opengles.GL10;

public class GLGraphicRenderer implements GLSurfaceView.Renderer  {

	public void onSurfaceCreated(GL10 unused, EGLConfig config) {
		// Set the background frame color
		GLES20.glClearColor(1.0f, 0.0f, 0.0f, 1.0f);
	}

	public void onDrawFrame(GL10 unused) {
		// Redraw background color
		GLES20.glClear(GLES20.GL_COLOR_BUFFER_BIT | GLES20.GL_DEPTH_BUFFER_BIT);
	}

	public void onSurfaceChanged(GL10 unused, int width, int height) {
		GLES20.glViewport(0, 0, width, height);
	}
}
Attach SurfaceView to the Activity
Finally, with all of the prerequisite objects for rendering with OpenGL-ES covered. We can now add the view to the activity. In this case, as the root element of the view hierarchy. Of course, it could have been added as part of the layout file.
import android.os.Bundle;
import androidx.annotation.Nullable;
import androidx.appcompat.app.AppCompatActivity;
public class MyActivity extends AppCompatActivity {
@Override
protected void onCreate(@Nullable Bundle savedInstanceState) {
super.onCreate(savedInstanceState);
GLGraphicSurfaceView surfaceView = new GLGraphicSurfaceView(this);
setContentView(surfaceView);
}
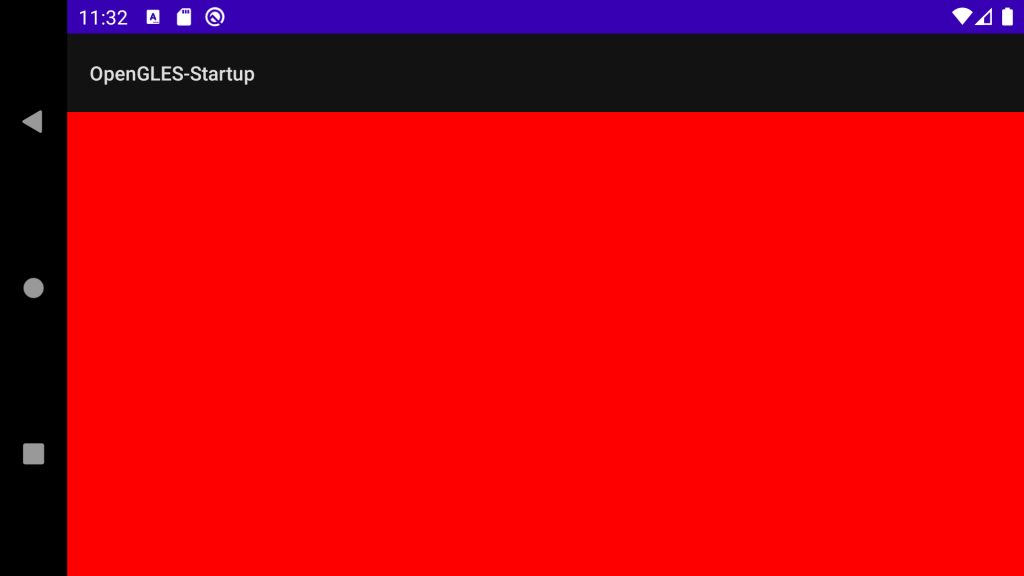
}Finally, here is the result of how it will look. Where the view underneath the toolbar is red, just as the clear color was specified in the renderer-object.
Support me by donation or by using the Affiliate links for your next purchase to help maintain this website.


Free/Open software developer, Linux user, Graphic C/C++ software developer, network & hardware enthusiast.